

Jennifer Grace Creates – Frosty Festivities Blog Hop
Good Afternoon!
I’m so pleased you have been able to join me on this Blog Hop, the mid way free blog event hosted by the talented and diverse crafter Jennifer Grace over on her website Jennifer Grace Creates.
Jennifer’s Frosty Festivities 2015 event sees her posting festive themed projects every single day throughout November. There are tutorials, giveaways, challenges to enter and prizes to win. There is so much inspiration for all types of crafter, whether you are a cardmaker, scrapbooker, sewer, mixed media artist – there is something for everyone. All projects created with Jennifer’s unique clean and crisp style……I love it, and I hope with will too.
For those who take part and comment on all the blogs in the hop there is a special prize, see the details at the end of my post. The giveaway is open until 6th December 2015.
![]()
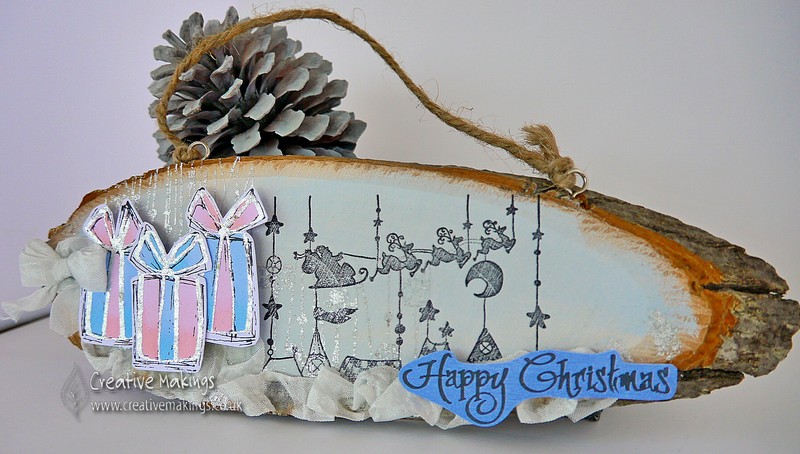
I had just finished making this when Jennifer first sent the invitation to join in with this event, so I accepted the offer and immediately decided that this would be the project I shared with you – it was such a coincidence, that made me smile, when I saw Jennifer posting her take on Wood Slice Ornaments & Gifts a couple of weeks later as part of her blog event.
As I had this project ready before hand, I have no step by step photos to share, but I can talk you through the process to make it. You can adapt the method to whatever surface you have available to decorate (whether it be wood, canvas, paper etc).
TO MAKE
- Cover your surface with a layer of acrylic paint, and allow to dry. I have used IndigoBlu’s English Cottage Acrylic Paint called Grandma’s Teacup .
- Stamp the IndigoBlu Triple parcels (a two stamp system) onto white cardstock. I stamped the sketchy outline with Tuxedo Black Memento Ink, and the Solid outline with IndigoBlu flitterglu before gilding with Winter Dawn megaflakes.
- Colour the parcels with your favourite alcohol markers. I have used promarkers Pink Mittens and Pale Blue. Fussy out each of the individual parcels and set to one side.
- Ensuring the paint is completely dry, stamp all over the wooden plaque with IndigoBlu’s Snowflake Border rubber stamp and Flitterglu, again gild using Winter Dawn megaflakes.
- Stamp IndigoBlu’s Flying Santa rubber stamp directly onto the face of the plaque, using black archival ink. Stamp off centre and towards the right. If needed when the ink had dried, take a black fine liner (micron) pen and define some of the stamped lines.
- Arrange and adhere ribbon (or seam binding as I’ve used) along the bottom edge of the plaque, and tie a coordinating bow to attach towards the left.
- Take the previously stamped parcels, and using silicone glue gel (to create dimension) arrange and adhere alongside the bow.
- Complete the project by stamping a seasonal sentiment onto coordinating card stock.
Thank you so much for joining us on this Festive Blog Hop, I can’t wait to go and check out what everyone one else has been creating.
Now to continue the hop head on to
or
if you get lost head back to JENNIFER GRACE CREATES
See you again soon

COMPLETE BLOG HOP LIST
Jennifer – http://jennifergracecreates.com/
Claire N – https://creativemakings.co.uk/
Clare B – http://crafty-clare.blogspot.co.uk/
Daphne – https://dapfniedesign.wordpress.com/
Furrypig – http://chattycraftyartypig.blogspot.co.uk/
Jacky – http://scrappyjackylive.blogspot.co.uk/
Julia – http://juliaheald.blogspot.co.uk/
Katherine – http://fruitofmyscraps.blogspot.co.uk/
Leslie – http://lcsmithsaved-outofthemire.blogspot.co.uk/
Mandysea – http://teacupofscrapisms.blogspot.com.au/
Sheena – http://sheenasscrapsandscribbles.blogspot.co.uk/
Jennifer – http://jennifergracecreates.com/


22 Comments
Joan Macdonald
This is stunning Claire, I’m looking forward to seeing it at New Year.
Mum xx
Katherine
Gorgeous ornament – I love the wooden base and all the sparkle with the flakes 🙂
Janis in ID
LOVE your painted and stamped wooden plaque!!! What a festive decor piece. The rustic wood really fits with the wintery holiday season. Great choice of stamps.
<3 J
jwoolbright at gmail dot com
HerPeacefulGarden.blogspot.com
Shelley
A lovely project-your instructions are great and easy to follow. Thanks for sharing!
furrypig
what a great project and love all the stamping
Denise Bryant
Love your wood slice decoration! Looks like a very fun project! I’m anxious to try one!
Daphne
Gorgeous piece of decoration! Well done!
Fay
Very sweet ornament, great idea.
K
Oh thats lovely! I’ll be keeping me peepers peeled for a slice of wood, youve inspired me 🙂
mandysea
This is gorgeous.. and unique! love the presents and the silver detail…. I’ve really not come across ‘slices’ before until Jennifer showed hers, and now you…. I’ll have to keep an eye open for them!
Julene Matthews
What a fabulous unique ornament. It definitely defines Christmas in a cold climate.
KT Fit Kitty
Wow, this is gorgeous! I love your holiday decor! So creative! These are so trendy right now – beautiful!
deb
Oh my! This is just gorgeous. The little parcels are so pretty.
Lizzy Hill
Fabulous project – really creative….love the colours you’ve used, & the silver thread….YUM!!! Hopping along… 🙂
clarebrown
love this idea Claire, very clever!
Jacky S
What a lovely idea.
Joschi
What a great idea.
Leslie
What a wonderful case of serendipity! This is such a lovely project – would not have thought the stamp could come out so well.
sheena
This is fabulous x
Thanks for sharing.
Mary Bennetts
So different and clever. Really lovely
Mary
Margot
Lovely project!
Jennifer Grace
Claire this is so beautiful, I love the stamped presents. The light colours make it all feel so delicate even though it’s a thick wood piece! Thank you so much for taking part in my blog hop, it was lovely to have your blog as a part of the event. x