
Creative Expressions, Retro Background Stamped Pattern
Morning!
Well, we’ve had a fair few wild weather days haven’t we, with the strength of the gales blowing across the open fields off of the Atlantic, I’m surprised we haven’t been picked up and blown across the water to land in the UK – I think we are all best hunkered down and cosy in our craft rooms with a cup of something hot don’t you!
I have joined Bloglovin, a fabulous online tool, that allows you to keep up to date with all the latest blog posts from all your favourite bloggers and designers etc. if you’d like to follow my blog please follow the Bloglovin link below, or click the grey ‘+’ button in my social media tab in the side bar.
https://www.bloglovin.com/blogs/creative-makings-14672261
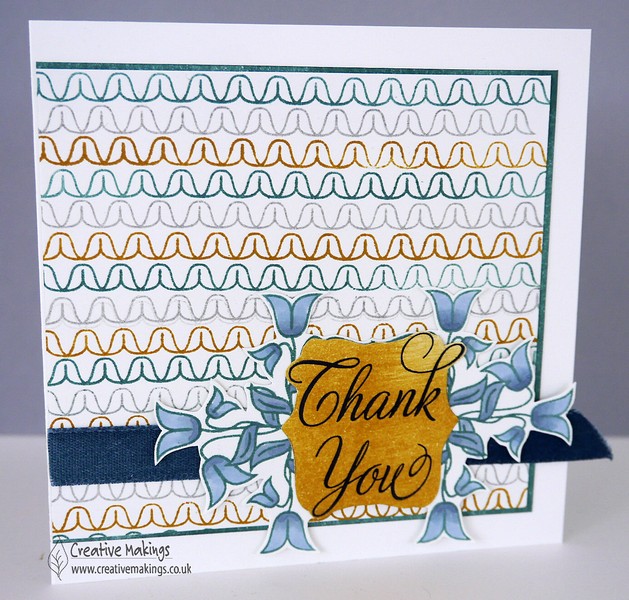
Well today, I have a card again using the clear stamp set Zen Betty by Creative Expressions.
I have used my favourite colours at the moment, and I think it will can work perfectly as a card for either a guy or a girl, changing the colours and sentiment to suit of course.
I also wanted to show you how to make the most of the additional stamps that are part of these sets you buy. You don’t always have to use the main image, that usually attracts you initially. Knowing how to create backgrounds like this means that these extra stamps are a valuable asset in your crafty stash that you can reach for time and again to compliment many more focal images.
1- On a piece of white stamping card, stamp the longest linear pattern design, repeatedly with your chosen colours. Keep each stamped impression closely aligned with it’s neighbour.

2- Continue stamping until you have covered the required area, and then trim the stamped card stock to size. I have cut my layer to 10.5 x 9.5 cm. Mat and layer onto a coordinating piece of cardstock. I have cut my layer and used one of the inks from the stamped design, to colour tint the edges of the cardstock mat so I get fully coordinated look.

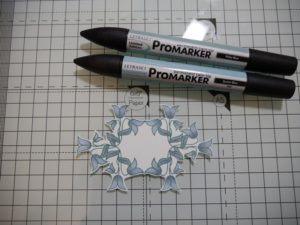
3- Next, take the corner stamp from the same set and stamp twice next to each other and shown in the photo below to create a type of frame. use your favourite medium to colour the flowers in this design. I have used alcohol marker pens, and they worked beautifully on the Creative Expressions white foundation cardstock.

4- Cut out the stamped and coloured frame from the previous step, ensuring to stay close to the design. Using small and sharp scissors for this jo, and taking your time will mean that when done, this frame will look as if it has actually been die cut.
5- Stamp a saying from the Creative Expression Elegant Sentiment stamp set using Memento dye ink (Tuxedo Black). When the black ink has dried properly, use another of the inks from the stamped background to colour tint the sentiment cardstock. Using scissors again. cut the sentiment into a shape that will fit the stamped decorative frame from the previous step.

6- Layer the sentiment onto the frame, and assemble all the stamped elements onto a 11.5cm square card blank, with the addition of a length of coordinating ribbon to complete the look.
I hope I have helped you to view your stamps sets with a new eye today, and inspired you to perhaps use those accompanying designs.
Please click the link below to see what the other members of the Creative Expressions Design Team have been creating!
Many thanks for joining me today, hope to see you next week. x


5 Comments
Lynn Brown
What a great idea Claire and so effective.
Lynn x
Jackie T
Hi Claire this is a gorgeous card. Thank you for the tutorial. Hugs Jackie
Kathy
This is lovely, I really like the crisp, clean effect of the design and these colours
Lea
Fabulous card. Great design x
Gwyneth George
Lovely card and nice clear instructions.